Test the API with Postman
Objective
This example is shows how you can send a document for signing using Postman.
For this task, you will need the following:
- A PDF document to be digitally signed
- An activated Sign.net API key (Get an API Key!)
Step 1: Sending the document
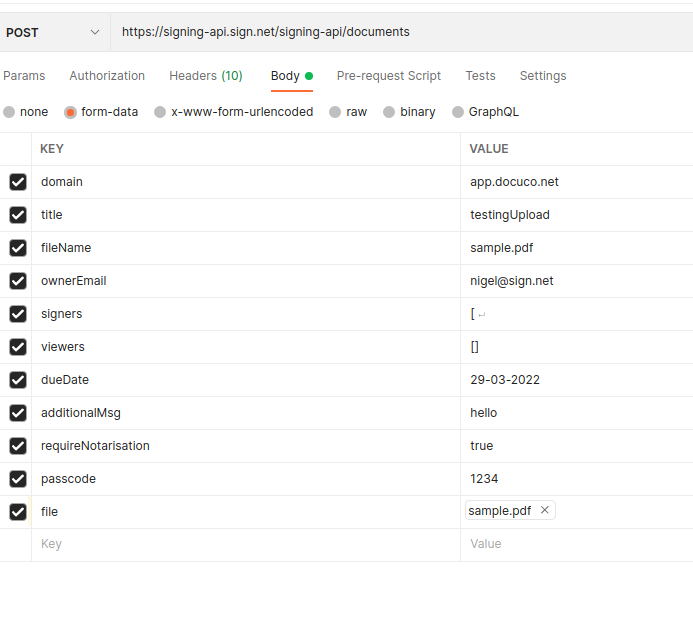
First, let's start with the query. The we will call the following URL to upload the document
POST https://signing-api.sign.net/signing-api/documents
Ensure that you insert your api key as a bearer token under the authorization tab. Please make sure that for all API calls to the signing api that you include the API key
Your query on postman should be structure as shown below.

We will leave the viewers as an empty array for this example. For your signers, you can use the following json structure. Do remember to change the email, firstName and lastName keys to your own.
[
  {
    "annotations": [
      {
        "type": "Signature",
        "content": "Signature",
        "isVerified": false,
        "style": {
          "width": 150,
          "height": 100,
          "x": 388.46088,
          "y": 213.24979,
          "page": 1,
          "fontSize": "15pt"
        }
      }
    ],
    "domain": "app.sign.net",
    "email": "*signer_email*",
    "firstName": "*signer_first_name*",
    "lastName": "*signer_last_Name*",
    "signOrder": 0
  }
]
Once you structured your query, you can click the send button to call the API and if the upload is successful then your response should look like this.
{
    "status": "OK",
    "data": {
        "result": {
            "message": "Insert document successfully.",
            "docId": "Your_Doc_ID"
        }
    }
}
Be sure to save the document ID as that will be needed for the next step
Step 2: Getting the document information
For this step, we will be retrieving the document information using the document ID which was generated in step 1. We will query the following endpoint to get the document information.
POST https://signing-api.sign.net/signing-api/documents/view
For this endpoint, you will need to provide the document ID and the domain ( it should be "app.sign.net" by default)
NOTE: For postman, the request body should be sent as "Text" instead of "JSON".

Take down the Annotation ID of your document, you will need it for signing the document.
Step 3: Getting the signature data
For this step, we will be getting the signature data so that we can choose 1 to insert into our document. For this task, you will need to query the below endpoint without any body data in the GET request
GET https://signing-api.sign.net/signing-api/signatures/list
Take down the ID of the signature that you want to place in the document
Step 4: Signing the document
For this step, we will be signing the document which you have uploaded.
You will need the following:
- Document ID
- Annotation ID
- Signature ID
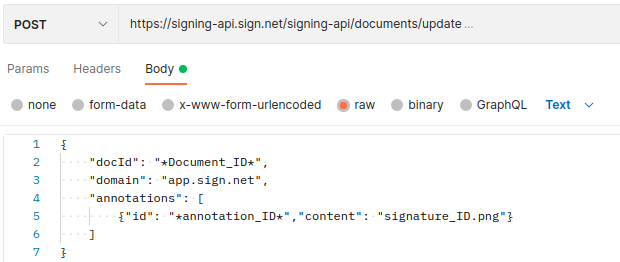
POST https://signing-api.sign.net/signing-api/documents/update
Your request should look like this. For this example we will only be updating one annotation, but you can use multiple annotations if you wish. Similarly, ensure that the request body is sent in "Text" rather than "JSON"

Upon successfully API call, you will receive the following response.
{
    "status": "OK",
    "data": {
        "message": "Document has been updated successfully.",
        "docId": "*Document_ID*"
    }
}
With this you have successfully sent and signed a document using the signing api. Upon signing, you will receive an email where you can view the signed document. Alternatively, you can log in to the [Sign.net] (https://app.sign.net) site to view your document.
Updated about 2 years ago